< Back ×
2000 GMC C3500 Tailgate Handle
My Vehicle Change Vehicle
2000 GMC C3500
< Back to View All
Trunks & Tailgates
- Department
- Color
- Color/Finish
- Type
- Brands
- Prices
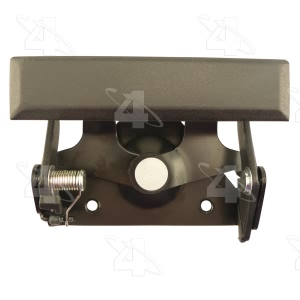

ACI® Tailgate Handle for 2000 GMC C3500
PartNumber: 360218Product Specifications- Notes: Black Finish (Texture)
- Color: Texture Black Finish
- Keys Included: Not Included
- Linkage Included: Not Included
- Lock Cylinder Included: Not Included
- Meets / Exceeds OEM: Yes
- Mount Location: Tailgate
- Mounting Hardware: Not Included
- Style: Tailgate Handle
- UPC: 080738602189
- Part Description: 2000 GMC C3500 Tailgate Handle
Vehicle Fitment- 2000 GMC C3500 | All Trims | All Engines
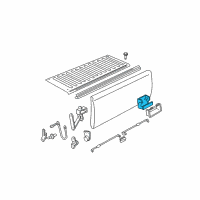
OEM (Genuine) 2000 GMC C3500 Handle
PartNumber: 15991785Product Specifications- Notes: 6.5 Foot Fleetside; 8 Foot Fleetside
- Other Names: Handle
- Item Dimensions: 7.0 x 6.6 x 4.3 inches
- Item Weight: 1.70 Pounds
- Fitment Type: Direct Replacement
- Part Description: 2000 GMC C3500 Handle
Vehicle Fitment- 2000 GMC C3500 | Sierra, Sierra SL, Sierra SLE, Sierra SLT, Sierra SLX | 8 Cyl 5.7 L CNG, 8 Cyl 5.7 L GAS, 8 Cyl 6.2 L DIESEL, 8 Cyl 6.5 L DIESEL, 8 Cyl 7.4 L GAS
FAQ for Tailgate Handle Repair
Q: How do I install the endgate latch?
A:
You should engage the linkage rod to the latch assembly, and install the latch assembly and the latch assembly bolts. Then you should connect the cables on each side of the endgate to the side panel cable retainer bolts, engage the linkage rods, raise the endgate, install the endgate handle bezel and tighten the handle bolts.
By Bob
GM Specialist
02/11/2022Q: How do I remove the hinge from the endgate?
A:
You should drill a pilot hole in the center of the weld and drill out the weld from the endgate side of the hinge with a 9.5 mm (0.375 in) drill bit.
By Bob
GM Specialist
02/11/2022Q: How do I install the endgate hinge?
A:
You should install the hinge to the endgate and the hinge bolt. Then you should plug and weld the hole that was drilled in the endgate and MIG weld the hinge to the endgate around the edge of the hinge. Then you should paint and lubricate the hinge. Lastly, install the endgate to the pickup box.
By Bob
GM Specialist
02/11/2022Q: What is the recommended torque for installing the hinge bolt?
A:
The recommended torque is 27 N.m (20 lb-ft).
By Bob
GM Specialist
02/11/2022Q: How do I remove the endgate latch?
A:
You should lower the endgate, loosen the handle bolts, raise the endgate and remove the handle bezel by prying gently on the upper snap-in tabs. Then you should disengage the linkage rods and lower and support the endgate and remove the cables from the side panel cable retainer bolts. Lastly, you should remove the bolt holding the latch assembly, disengage the linkage rod from the latch assembly and remove the latch assembly from the endgate.
By Bob
GM Specialist
02/11/2022Q: How do I remove the endgate Linkage?
A:
You should remove the operating handle, lower and support the endgate, lift the cables off the striker bolts and remove the three bolts holding the latch assembly to the endgate and remove the latch assembly and the rod.
By Bob
GM Specialist
01/11/2022Q: How do I install the Endgate Linkage (Pickup)?
A:
You should install the linkage rod to the endgate handle assembly, engage the linkage rod to the latch assembly, install the endgate latch assembly, raise the endgate, install the endgate handle bezel and tighten the endgate handle bolts.
By Bob
GM Specialist
01/11/2022Q: How do I install the Endgate Handle Replacement (Utility)?
A:
You should install the handle assembly into the endgate, install the latch operating rods into the clips on the handle, install the two bolts and the washers onto the handle assembly from the back of the endgate, install the latch assembly cover to the endgate and install the endgate trim panel.
By Bob
GM Specialist
01/11/2022Q: How do I replace the End Gate Latch Handle Bezel?
A:
You should release the adhesive blocks after the upper retaining tabs are released, install the latch handle bezel with the end gate in the closed position, and clean the sheet metal at the right and left sides of the bezel opening with an alcohol wipe prior to the bezel installation, peel the protective tape liner from the foam block on both sides, seat the bezel at the bottom of the opening in the end gate, roll the bezel forward seating and securing the upper integral locking tab, apply palm pressure to both outer edges of the bezel, integral Locking Tabs (Upper and Lower) and end Gate Latch Handle Bezel.
By Bob
GM Specialist
01/11/2022Q: How do I remove the Endgate Handle Replacement (Utility)?
A:
You should lower the endgate, remove the trim panel, remove the latch assembly cover from the endgate, remove the two bolts and the washers from the back of the endgate behind the handle assembly, raise the endgate, remove the handle assembly by prying gent, remove the latch operating rods from the clips on the handle by pushing the rods back and remove the handle assembly from the endgate.
By Bob
GM Specialist
01/11/2022See more FAQs (9)