< Back ×
2004 Cadillac XLR Pillar Panels
My Vehicle Change Vehicle
2004 Cadillac XLR
< Back to View All
Interior & Exterior Trim
- Department
- Prices
 Product Specifications
- Notes: Ebony
- Location: Driver Side
- Other Names: Weatherstrip Pillar Trim
- Item Dimensions: 37.8 x 7.8 x 7.7 inches
- Item Weight: 1.20 Pounds
- Fitment Type: Direct Replacement
- Replaces: 15266984
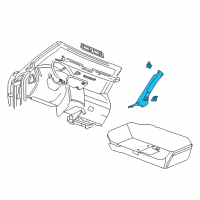
- Part Description: Molding Asm-Windshield Side Garnish *Ebony
- Product Specifications
- Notes: Ebony
- Location: Passenger Side
- Other Names: Weatherstrip Pillar Trim
- Item Dimensions: 36.8 x 8.0 x 7.9 inches
- Item Weight: 1.20 Pounds
- Fitment Type: Direct Replacement
- Replaces: 10316722, 21994520
- Part Description: Molding Asm-Windshield Side Garnish *Ebony
- Product Specifications
- Notes: Shale
- Location: Driver Side
- Other Names: Weatherstrip Pillar Trim
- Item Dimensions: 36.8 x 7.8 x 8.0 inches
- Item Weight: 1.20 Pounds
- Fitment Type: Direct Replacement
- Part Description: Molding Asm-Windshield Side Garnish *Neutral
- Product Specifications
- Notes: Shale
- Location: Passenger Side
- Other Names: Weatherstrip Pillar Trim
- Item Dimensions: 36.8 x 7.7 x 7.8 inches
- Item Weight: 1.20 Pounds
- Fitment Type: Direct Replacement
- Part Description: Molding Asm-Windshield Side Garnish *Neutral
 Product Specifications
- Notes: Shale
- Location: Passenger Side
- Other Names: Lock Pillar Trim
- Item Dimensions: 36.9 x 13.6 x 5.5 inches
- Item Weight: 1.60 Pounds
- Fitment Type: Direct Replacement
- Replaces: 10349320
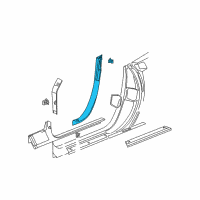
- Part Description: Panel Asm-Body Lock Pillar Trim *Shale
- Product Specifications
- Notes: Ebony
- Location: Passenger Side
- Other Names: Lock Pillar Trim
- Item Dimensions: 36.9 x 14.0 x 5.4 inches
- Item Weight: 1.60 Pounds
- Fitment Type: Direct Replacement
- Part Description: Panel Asm-Body Lock Pillar Trim *Ebony
- Product Specifications
- Notes: Ebony
- Location: Driver Side
- Other Names: Lock Pillar Trim
- Item Dimensions: 36.7 x 9.8 x 5.9 inches
- Item Weight: 1.60 Pounds
- Fitment Type: Direct Replacement
- Part Description: Panel Asm-Body Lock Pillar Trim *Ebony
- Product Specifications
- Notes: Shale
- Location: Driver Side
- Other Names: Lock Pillar Trim
- Item Dimensions: 36.2 x 13.7 x 5.4 inches
- Item Weight: 1.40 Pounds
- Fitment Type: Direct Replacement
- Replaces: 10354902
- Part Description: Panel Asm-Body Lock Pillar Trim *Shale
FAQ for Pillar Panels Repair
Q: What's the installation procedure for the front floor kick-up panel?
A:
The installation procedure is to lift the kick-up panel and press the panel into place, install the passenger floor mat.
By Bob
GM Specialist
02/11/2022Q: What's the installation procedure for the windshield side garnish moldings?
A:
The installation procedure is to position the side garnish molding behind the lock pillar molding and retainer, position the side garnish molding with its retainers to the holes in the windshield frame, push on the molding snapping the retainers into the windshield frame.
By Bob
GM Specialist
02/11/2022Q: What should be done before removing the rear compartment lid trim?
A:
You will need to open the rear compartment lid.
By Bob
GM Specialist
02/11/2022Q: What's the recommended torque for the footrest nut installed to the stud?
A:
The recommended torque is 10 N.m (89 lb in).
By Bob
GM Specialist
02/11/2022Q: How do you remove the LH rear compartment side trim?
A:
You can remove the sill plate, the floor trim plate, the push-in retainer, and the left-hand trim panel from the rear compartment.
By Bob
GM Specialist
02/11/2022Q: What's the installation procedure for the lock pillar trim?
A:
The installation procedure is to install the lock pillar trim, engage the retainers, position the seat fully rearward, and install the door sill plate.
By Bob
GM Specialist
02/11/2022Q: What's the installation procedure for the rear floor trim plate?
A:
The installation procedure is to position the floor trim plate into the rear compartment, engage the sides of the floor trim plate, press the sides into place, install the forward floor trim plate attachments and attach the elastic loops to the pins, install the rear compartment partition, the roof lift-off panel/window latch trim, the rear compartment sill plate, then close the rear compartment.
By Bob
GM Specialist
02/11/2022Q: What's the installation procedure for the rear quarter trim panel?
A:
The installation procedure is to install the rear quarter trim panel to the folding top, position the lower molding to the folding top through the rear compartment, install the retaining bolts to secure the molding to the folding top, raise the rear compartment partition and latch the partition in place, then close the rear compartment.
By Bob
GM Specialist
02/11/2022Q: What's the recommended torque for the roof bar tube retaining bolts?
A:
The recommended torque is 10 N.m (89 lb in).
By Bob
GM Specialist
02/11/2022Q: What's the installation procedure for the rear window garnish molding?
A:
The installation procedure is to align the rear garnish molding to the holes in the folding top panel, install the molding and engage the retaining clips, and manually close the folding top.
By Bob
GM Specialist
02/11/2022See more FAQs (44)