< Back ×
2005 Buick Century A/C Hose
My Vehicle Change Vehicle
2005 Buick Century
< Back to View All
A/C & Heating
- Department
- Prices
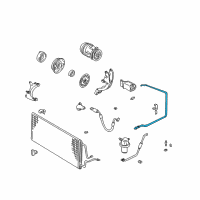
OEM (Genuine) 2005 Buick Century AC Hose
PartNumber: 10308247$55.71 MSRP:$105.14You Save: $49.43 (48%)Product Specifications- Other Names: AC Hose, AC Line, Accumulator Tube, Hose
- Item Dimensions: 22.5 x 11.8 x 18.4 inches
- Item Weight: 1.10 Pounds
- Fitment Type: Direct Replacement
- Part Description: 2005 Buick Century AC Hose
Vehicle Fitment- 2005 Buick Century | Custom, Limited, Special Edition | 6 Cyl 3.1 L GAS
 Product Specifications
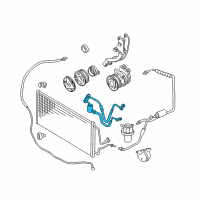
- Notes: Evaporator
- Other Names: AC Line, AC Tube, Evaporator Tube
- Item Dimensions: 35.7 x 17.2 x 15.3 inches
- Item Weight: 1.00 Pounds
- Fitment Type: Direct Replacement
- Replaces: 10295391, 10445946, 10433079
- Part Description: 2005 Buick Century Tube Asm-A/C Evaporator
Vehicle Fitment- 2005 Buick Century | Custom, Limited, Special Edition | 6 Cyl 3.1 L GAS
 Product Specifications
- Notes: 3.1L; Century
- Item Dimensions: 25.2 x 20.7 x 7.6 inches
- Item Weight: 2.90 Pounds
- Fitment Type: Direct Replacement
- Part Description: 2005 Buick Century Hose & Tube Assembly
Vehicle Fitment- 2005 Buick Century | Custom, Limited, Special Edition | 6 Cyl 3.1 L GAS
 Product Specifications
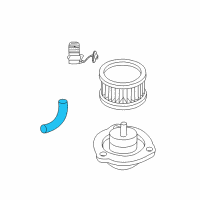
- Other Names: Blower Motor Tube, Hose, Tube
- Item Dimensions: 6.7 x 6.3 x 1.0 inches
- Item Weight: 0.40 Pounds
- Fitment Type: Direct Replacement
- Part Description: 2005 Buick Century Tube, Blower Motor Cooling
Vehicle Fitment- 2005 Buick Century | Custom, Limited, Special Edition | 6 Cyl 3.1 L GAS
FAQ for A/C Hose Repair
Q: How do you remove the Compressor Hose Assembly?
A:
You need to recover the refrigerant, remove the air cleaner assembly and the A/C compressor hose nut, disconnect the A/C compressor hose from the condenser, and remove the A/C compressor hose nut, the A/C compressor hose from the accumulator, the lower air deflector, the A/C compressor hose assembly bolt from the A/C compressor and the A/C compressor hose from the A/C compressor.
By Bob
GM Specialist
01/11/2022Q: How do you install the Compressor Hose Assembly?
A:
You need to install the new sealing washers onto the A/C compressor hose assembly, the A/C compressor hose to the A/C compressor, the A/C compressor hose bolt, the lower air deflector, the new O-ring seal to the A/C compressor hose assembly, the A/C compressor hose to the accumulator, the A/C compressor hose nut to the accumulator, the A/C compressor hose to the condenser, the A/C compressor hose nut to the condenser and the air cleaner assembly, and then evacuate and recharge the A/C system.
By Bob
GM Specialist
01/11/2022Q: What is the recommended torque for the evaporator tube nut?
A:
The recommended torque is 27 Nm (20 lb-ft).
By Bob
GM Specialist
28/10/2022Q: How do you remove the Evaporator Tube?
A:
You need to recover the refrigerant, remove the air cleaner assembly, the vacuum brake booster, and the condenser tube from the support clip, disconnect the evaporator tube nut from the condenser tube and the evaporator tube from the condenser tube, remove the accumulator tube block fitting bolt from the evaporator, disconnect the evaporator tube from the evaporator and remove the O-ring and discard.
By Bob
GM Specialist
28/10/2022Q: What is the recommended torque for the accumulator block fitting bolt?
A:
The recommended torque is 16 Nm (12 lb-ft).
By Bob
GM Specialist
28/10/2022Q: How do you install the Evaporator Tube?
A:
You need to install the new O-ring seals onto the evaporator tube, connect the evaporator inlet tube to the condenser tube and the evaporator tube to the evaporator, install the accumulator tube to the evaporator block fitting and the accumulator block fitting bolt to the evaporator, tighten the evaporator tube nut, install the condenser tube to the support clip, the vacuum brake booster, and the air cleaner assembly and evacuate and recharge the A/C system.
By Bob
GM Specialist
28/10/2022Q: What is the recommended torque for the condenser tube nut?
A:
The recommended torque is 27 Nm (20 lb-ft).
By Bob
GM Specialist
28/10/2022Q: How do you install the Condenser Tube?
A:
You need to install the A/C pressure sensor to the condenser tube, the new O-ring onto the condenser tube, and the condenser tube to the support clip, connect the evaporator tube to the condenser tube, tighten the evaporator tube nut, connect the A/C refrigerant pressure sensor electrical connector and the condenser tube to the condenser, tighten the condenser tube nut, install the lower radiator air baffle, the vacuum brake booster, and the air cleaner assembly and evacuate and recharge the A/C system.
By Bob
GM Specialist
28/10/2022Q: How do you remove the Condenser Tube?
A:
You need to recover the refrigerant, remove the air cleaner assembly, the vacuum brake booster and the lower radiator air baffle, loosen the condenser tube nut at the condenser, disconnect the condenser tube from the condenser and the electrical connector from the A/C refrigerant pressure sensor, remove the condenser tube from the support clip, loosen the evaporator tube nut from the condenser tube, disconnect the evaporator tube from the condenser tube and remove the condenser tube, remove and discard the O-ring and remove the A/C pressure sensor from the condenser tube.
By Bob
GM Specialist
28/10/2022See more FAQs (4)