< Back ×
2005 Buick Century Pillar Panels
My Vehicle Change Vehicle
2005 Buick Century
< Back to View All
Interior & Exterior Trim
- Department
- Prices
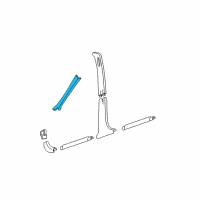
OEM (Genuine) 2005 Buick Century Molding Asm-Windshield Side Upper Garnish *Gray
PartNumber: 10446687Product Specifications- Notes: Gray
- Location: Driver Side
- Other Names: Windshield Pillar Trim
- Item Dimensions: 31.4 x 6.2 x 3.2 inches
- Item Weight: 0.60 Pounds
- Fitment Type: Direct Replacement
- Part Description: 2005 Buick Century Molding Asm-Windshield Side Upper Garnish *Gray
Vehicle Fitment- 2005 Buick Century | Custom, Limited, Special Edition | 6 Cyl 3.1 L GAS
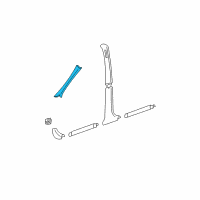
OEM (Genuine) 2005 Buick Century Molding Asm-Windshield Side Upper Garnish *Gray
PartNumber: 10344597Product Specifications- Notes: Gray
- Location: Passenger Side
- Other Names: Windshield Pillar Trim
- Item Dimensions: 31.6 x 6.1 x 28.8 inches
- Item Weight: 1.00 Pounds
- Fitment Type: Direct Replacement
- Part Description: 2005 Buick Century Molding Asm-Windshield Side Upper Garnish *Gray
Vehicle Fitment- 2005 Buick Century | Custom, Limited, Special Edition | 6 Cyl 3.1 L GAS
OEM (Genuine) 2005 Buick Century Molding Asm-Windshield Side Upper Garnish *Neutral
PartNumber: 10344598Product Specifications- Notes: Neutral
- Location: Passenger Side
- Other Names: Windshield Pillar Trim
- Item Dimensions: 31.3 x 6.0 x 29.1 inches
- Item Weight: 1.00 Pounds
- Fitment Type: Direct Replacement
- Part Description: 2005 Buick Century Molding Asm-Windshield Side Upper Garnish *Neutral
Vehicle Fitment- 2005 Buick Century | Custom, Limited, Special Edition | 6 Cyl 3.1 L GAS
OEM (Genuine) 2005 Buick Century Molding Asm-Windshield Side Upper Garnish *Neutral
PartNumber: 10446689Product Specifications- Notes: Neutral
- Location: Driver Side
- Other Names: Windshield Pillar Trim
- Item Dimensions: 32.0 x 6.1 x 3.2 inches
- Item Weight: 0.60 Pounds
- Fitment Type: Direct Replacement
- Part Description: 2005 Buick Century Molding Asm-Windshield Side Upper Garnish *Neutral
Vehicle Fitment- 2005 Buick Century | Custom, Limited, Special Edition | 6 Cyl 3.1 L GAS
 Product Specifications
- Notes: Neutral
- Location: Driver Side
- Other Names: Cowl Trim, Pillar Trim
- Item Dimensions: 10.9 x 5.7 x 1.7 inches
- Item Weight: 0.50 Pounds
- Fitment Type: Direct Replacement
- Part Description: 2005 Buick Century PANEL, Cowl Trim
Vehicle Fitment- 2005 Buick Century | Custom, Limited, Special Edition | 6 Cyl 3.1 L GAS
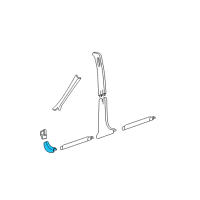
- Product Specifications
- Notes: Gray
- Location: Passenger Side
- Other Names: Cowl Trim, Pillar Trim
- Item Dimensions: 11.9 x 6.3 x 4.3 inches
- Item Weight: 0.40 Pounds
- Fitment Type: Direct Replacement
- Replaces: 10400389
- Part Description: 2005 Buick Century Panel-Body Hinge Pillar Trim *Gray
Vehicle Fitment- 2005 Buick Century | Custom, Limited, Special Edition | 6 Cyl 3.1 L GAS
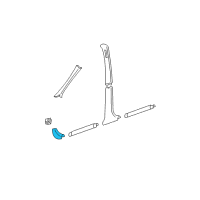 Product Specifications
- Notes: Neutral
- Location: Passenger Side
- Other Names: Cowl Trim, Pillar Trim
- Item Dimensions: 12.1 x 6.4 x 4.4 inches
- Item Weight: 0.40 Pounds
- Fitment Type: Direct Replacement
- Part Description: 2005 Buick Century Panel-Body Hinge Pillar Trim *Neutral
Vehicle Fitment- 2005 Buick Century | Custom, Limited, Special Edition | 6 Cyl 3.1 L GAS
- Product Specifications
- Notes: Gray
- Location: Driver Side
- Other Names: Cowl Trim, Pillar Trim
- Item Dimensions: 11.0 x 5.7 x 1.7 inches
- Item Weight: 0.50 Pounds
- Fitment Type: Direct Replacement
- Part Description: 2005 Buick Century PANEL, Cowl Trim
Vehicle Fitment- 2005 Buick Century | Custom, Limited, Special Edition | 6 Cyl 3.1 L GAS
FAQ for Pillar Panels Repair
Q: How do you install the Trim Panel-Rear Quarter Upper?
A:
You need to position the upper quarter trim panel into place and install the push-in retainers to secure the trim panel, the door weatherstrip onto the pinch weld flange, and the rear seat back.
By Bob
GM Specialist
02/11/2022Q: How do you install the Trim Panel-Rear Quarter Lower?
A:
You need to engage the push-in retainers to install the quarter lower trim and install the door weatherstrip, the rear seat back, the rear seat cushion, and the rear carpet retainer.
By Bob
GM Specialist
02/11/2022Q: How do you install the Trim Panel-Rear Window Shelf?
A:
You need to position the panel in the vehicle, connect the electrical cable connector for the high-mount stop lamp, located on the passenger end of the panel, slide the panel rearward to engage the integral hook in the retaining hole, lift the panel and route the seat belts through the slots in the trim panel and install the push pins in the panel front, the rear quarter upper trim panel, the rear seat back and the rear seat cushion. From inside the rear compartment, you can install the bulb in the high-mount stop lamp.
By Bob
GM Specialist
02/11/2022Q: How do you remove the Trim Panel-Rear Quarter Lower?
A:
You need to remove the rear carpet retainer, the rear seat cushion, the rear seat back, and the door weatherstrip from the pinch weld flange to expose the trim panel, use J 38778 to disengage the push-in retainers and then remove the quarter lower trim.
By Bob
GM Specialist
02/11/2022Q: How do you remove the Trim Panel-Rear Window Shelf?
A:
You need to remove the rear seat cushion, the rear seat back and the rear upper quarter trim panel, use J 38778 to remove the push pins from the panel front, lift the panel and remove the seat belts through the slots in the trim panel. Front inside the rear compartment, you can disengage the clip with the high-mount stop lamp. Then you can slide the panel forward to disengage the integral hook from the retaining hole, disconnect the electrical cable connector for the high-mount stop lamp, located on the passenger end of the panel, and remove the rear shelf from the vehicle.
By Bob
GM Specialist
02/11/2022Q: How do you remove the Sound Barrier-Rear Seat Back?
A:
You need to remove the rear seat cushion and the rear seat back. On stationary seat back models, you can remove the child seat belt bracket. Then you can remove the rear window trim panel, the upper quarter trim panel, and the lower quarter trim panel. On the split rear seat, you can remove the push-in retainers holding the rear compartment trim, and remove the sound barrier.
By Bob
GM Specialist
02/11/2022Q: How do you remove the Trim Panel-Lower Center Pillar?
A:
You need to remove the front carpet retainer, the rear carpet retainer, and the door weatherstrip from the center pillar pinch weld flange to expose the lower trim panel. Starting at the base, you can grasp the trim panel firmly with both hands. Then you can pull the panel away from the center pillar and remove the seat belt from the slot in the lower trim panel.
By Bob
GM Specialist
02/11/2022Q: How do you remove the Trim Panel-Rear Quarter Upper?
A:
You need to remove the rear seat back and the door weatherstrip from the pinch weld flange to expose the upper quarter trim panel and use J 38778 to disengage the push-in retainers and remove the trim panel.
By Bob
GM Specialist
02/11/2022Q: How do you remove the Garnish Molding-Lower Pillar?
A:
You need to remove the carpet retainer, reposition the front door weatherstrip as necessary, grasp the lower end of the molding and pull away from the pillar and remove the molding from the vehicle.
By Bob
GM Specialist
02/11/2022Q: How do you remove the Garnish Molding-Windshield Pillar?
A:
You need to pull the door weatherstrip away from the pinch weld flange to expose the garnish molding. You can pull on the garnish molding to disengage the 2 clips and remove the garnish molding from the car.
By Bob
GM Specialist
02/11/2022See more FAQs (35)