< Back ×
2005 Buick Rainier Air Temperature Sensor
My Vehicle Change Vehicle
2005 Buick Rainier
< Back to View All
A/C & Heating
- Department
- Brands
- Prices
OEM (Genuine) 2005 Buick Rainier Sensor
PartNumber: 12160244$16.91 MSRP:$27.96You Save: $11.05 (40%)Product Specifications- Notes: 4.2 Liter; All Models
- Item Dimensions: 2.8 x 2.0 x 0.4 inches
- Item Weight: 0.30 Pounds
- Fitment Type: Direct Replacement
- Replaces: 12110319
- Part Description: 2005 Buick Rainier Sensor
Vehicle Fitment- 2005 Buick Rainier | CXL, CXL Plus | 6 Cyl 4.2 L GAS, 8 Cyl 5.3 L GAS
 $22.05 MSRP:
$41.62You Save: $19.57 (48%)Product Specifications- Notes: All Models
- Item Dimensions: 2.7 x 2.6 x 1.9 inches
- Item Weight: 0.30 Pounds
- Fitment Type: Direct Replacement
- Part Description: 2005 Buick Rainier Air Temperature Sensor
Vehicle Fitment- 2005 Buick Rainier | CXL, CXL Plus | 6 Cyl 4.2 L GAS, 8 Cyl 5.3 L GAS
 Product Specifications
- Attachment Method: Plug In
- Color/Finish: Black
- Connector Gender: Female
- Connector Quantity: 1
- Connector Shape: Oval
- Connector Type: Plug In
- Contents: Sensor
- Hardware Included: No
- Mounting Hardware Included: No
- Mounting Type: Screw-in
- Notes: Complete Assembly
- Terminal Gender: Male
- Terminal Quantity: 2
- Terminal Type: Blade Terminals
- UPC: 841266056208
- Voltage [V]: 12
- Part Description: 2005 Buick Rainier Ambient Air Temperature Sensor
Vehicle Fitment- 2005 Buick Rainier | All Trims | 6 Cyl 4.2L
FAQ for Air Temperature Sensor Repair
Q: How to install the Air Temperature Sensor-Lower Left?
A:
You should install the lower left air temperature sensor, connect the electrical connector to the lower left air temperature sensor and install the I/P assembly.
By Bob
GM Specialist
01/11/2022Q: How to remove the Air Temperature Sensor-Lower Right?
A:
You should remove the passenger side closeout panel and the instrument panel (I/P) lower closeout panel, disconnect the electrical connector from the air temperature sensor-lower right and remove the air temperature sensor-lower right.
By Bob
GM Specialist
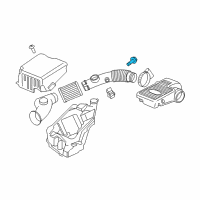
01/11/2022Q: How to remove the Intake Air Temperature Sensor?
A:
You should disconnect the intake air temperature (IAT) sensor electrical connector and remove the IAT sensor from the air duct with a twisting and pulling motion.
By Bob
GM Specialist
01/11/2022Q: How to update the Ambient Air Temperature?
A:
The Heating, Ventilation, and Air Conditioning (HVAC) control module will not request compressor clutch engagement when the ambient air temperature display is less than 5 °C (40 °F) and to inspect compressor clutch operation during cold weather conditions, the vehicle must be brought inside and the ambient air temperature display must be updated. To update the ambient air temperature display on the HVAC control module, you should turn on the ignition and simultaneously press the mode, and the front defrost and rear defrost switches.
By Bob
GM Specialist
01/11/2022Q: How to remove the Air Temperature Sensor-Lower Left?
A:
You should remove the instrument panel (I/P) assembly, disconnect the electrical connector from the lower left air temperature sensor and remove the lower left air temperature sensor.
By Bob
GM Specialist
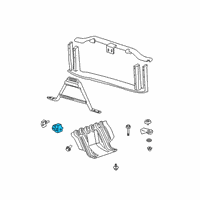
01/11/2022Q: How to remove the Ambient Air Temperature Sensor?
A:
You should remove the front grille and the sensor from the panel assembly and disconnect the electrical connector from the sensor.
By Bob
GM Specialist
01/11/2022Q: How to install the Intake Air Temperature Sensor?
A:
You should install the IAT sensor to the air duct with a pushing and twisting motion and reconnect the IAT sensor electrical connector.
By Bob
GM Specialist
01/11/2022Q: How to install the Air Temperature Sensor-Lower Right?
A:
You should install the lower right air temperature sensor, connect the electrical connector to the lower right air temperature sensor and install the I/P lower closeout panel and the passenger side closeout panel.
By Bob
GM Specialist
01/11/2022Q: How to install the Ambient Air Temperature Sensor?
A:
You should position the sensor to the panel assembly, connect the electrical connector to the sensor and install the sensor to the panel assembly and the front grille.
By Bob
GM Specialist
01/11/2022Q: How to install the Air Temperature Sensor-Upper Right?
A:
You should install the upper right air temperature sensor, connect the electrical connector to the upper right air temperature sensor and install the radio.
By Bob
GM Specialist
01/11/2022See more FAQs (8)