< Back ×
2005 Buick Rainier Camber and Alignment Kit
My Vehicle Change Vehicle
2005 Buick Rainier
< Back to View All
Alignment Kits
- Department
- Prices
 $1.20 MSRP:
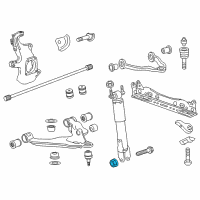
$1.97You Save: $0.77 (40%)Product Specifications- Notes: W/O Auto Level Control, Type 3; W/O Auto Level Control, Type 1; W/Auto Level Control, Type 3; W/Auto Level Control, Type 1
- Location: Driver Side; Passenger Side
- Item Dimensions: 4.2 x 3.0 x 0.7 inches
- Item Weight: 0.70 Pounds
- Fitment Type: Direct Replacement
- Replaces: 22123946, 15702050, 15048124, 14013439
- Part Description: 2005 Buick Rainier U-Bolt Nut
Vehicle Fitment- 2005 Buick Rainier | CXL, CXL Plus | 6 Cyl 4.2 L GAS, 8 Cyl 5.3 L GAS
 Product Specifications
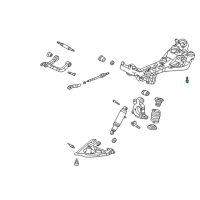
- Notes: W/O Auto Level Control, #4; W/Auto Level Control, #4
- Location: Driver Side; Passenger Side
- Item Dimensions: 5.1 x 3.6 x 2.1 inches
- Item Weight: 1.30 Pounds
- Fitment Type: Direct Replacement
- Part Description: 2005 Buick Rainier Bolt, Rear Axle
Vehicle Fitment- 2005 Buick Rainier | CXL, CXL Plus | 6 Cyl 4.2 L GAS, 8 Cyl 5.3 L GAS
FAQ for Camber and Alignment Kit Repair
Q: How to adjust the Front Caster and Camber?
A:
Before adjusting the caster and camber angles, you should jounce the front bumper 3 times to allow the vehicle to return to normal height and for an accurate reading, you should not push or pull on the tires during the alignment process. Then, you should determine the caster angle and the camber angle, loosen the lower control arm adjustment bolts, adjust the caster and the camber angle by repositioning the lower control arm until the specifications have been met, hold the lower control arm in position so that the specifications do not change while tightening the lower control arm adjustment bolts, verify that the caster and the camber are still within specifications and adjust the toe when the caster and camber are within specifications.
By Bob
GM Specialist
01/11/2022Q: What should be done before performing any adjustment affecting wheel alignment?
A:
You should inspect the tires for the proper inflation and irregular tire wear, the runout of the wheels and the tires, the wheel bearings for backlash and excessive play, the ball joints and tie rod ends for looseness or wear, the control arms and stabilizer shaft for looseness or wear, the steering gear for looseness at the frame, the struts/shock absorbers for wear, leaks, and any noticeable noises, the vehicle trim height, the steering wheel for excessive drag or poor return due to stiff or rusted linkage or suspension components and the fuel level.
By Bob
GM Specialist
01/11/2022Q: What is the recommended torque for the outer tie rod jam nut?
A:
The recommended torque is 75 Nm (55 ft-lbs).
By Bob
GM Specialist
01/11/2022Q: How to adjust the Front Toe?
A:
You should loosen the jam nut on the outer tie rod, rotate the inner tie rod to the required toe specification setting, take care that the boots are not twisted when rotating the inner tie rods, or damage to the boots may result, then tighten the jam nut on the outer tie rod, check the toe setting after tightening and re-adjust the toe setting if necessary.
By Bob
GM Specialist
01/11/2022