< Back ×
2005 Buick Rainier Hood Release Cable
My Vehicle Change Vehicle
2005 Buick Rainier
< Back to View All
Hoods
- Department
- Brands
- Prices
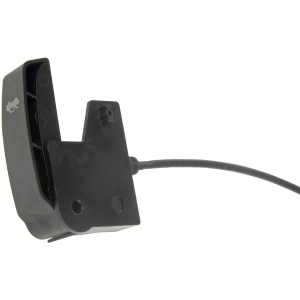
 $28.13Product Specifications
- Handle Included: Yes
- OE Part Number: 21997874, 15160712
- Package Contents: Hood Release Cable
- UPC: 019495258070
- Part Description: 2005 Buick Rainier OE Solutions Hood Release Cable
Vehicle Fitment- 2005 Buick Rainier | All Trims | All Engines
 $42.38 MSRP:
$63.95You Save: $21.57 (34%)Product Specifications- Other Names: Release Cable
- Item Dimensions: 10.5 x 10.4 x 4.2 inches
- Item Weight: 2.20 Pounds
- Fitment Type: Direct Replacement
- Replaces: 15160712
- Part Description: 2005 Buick Rainier Release Cable
Vehicle Fitment- 2005 Buick Rainier | CXL, CXL Plus | 6 Cyl 4.2 L GAS, 8 Cyl 5.3 L GAS
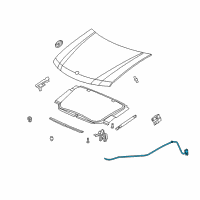
FAQ for Hood Release Cable Repair
Q: How to remove the Hood Latch Release Cable?
A:
You should remove the left front door sill plate, the left closeout/insulator panel, the grille, and the hood latch, release the hood latch release cable, attach a length of mechanic's wire to the exterior end of the cable, and note the routing of the cable for later installation, release the retainers securing the cable to the inner fender, feed the cable out from between the headlamp housing panel and the radiator, push the cable grommet through the bulkhead and into the interior of the vehicle, remove the nut and the cable from the release handle, pull the cable the rest of the way through the cowl panel and out from behind the sound insulation, detach the mechanic's wire from the cable, leaving the wire in position for aid in the installation of the cable and remove the cable from the vehicle.
By Bob
GM Specialist
01/11/2022