< Back ×
2008 Cadillac CTS A/C Expansion Valve
My Vehicle Change Vehicle
2008 Cadillac CTS
< Back to View All
A/C & Heating
- Department
- Location
- Brands
- Prices
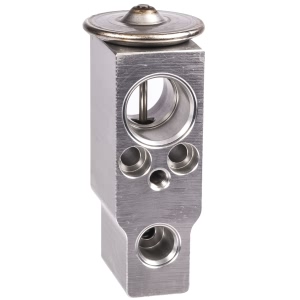
 $26.43Product Specifications
- Notes: OE recommended replacement part.
- OE Part Number: 19129999, 8851507030, 8851533020, 89022549
- Type: Block valve
- UPC: 042511223745
- Part Description: A/C Expansion Valve
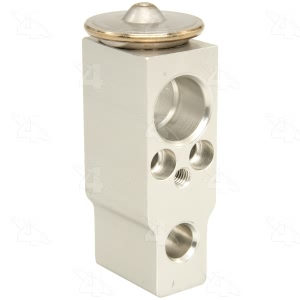
 $29.12Product Specifications
- Color: Aluminum
- Liquid Inlet Fitting Gender: Female
- Liquid Inlet Fitting Thread Diameter: No. 6
- Liquid Inlet Size IN: 0.390
- Liquid Inlet Size MM: 10.100
- Liquid Inlet Style: Captured O-Ring
- Liquid Inlet Type: O-Ring
- Liquid Outlet Fitting Gender: Female
- Liquid Outlet Fitting Thread Diameter: No. 10; No. 8
- Liquid Outlet Type: O-Ring
- Lqd Out Size IN: 0.600
- Lqd Out Size MM: 15.400
- Material: Aluminum
- Meets / Exceeds OEM: Yes
- Mounting Hole Quantity: 2
- O-Ring A Number/Desc: [24611] / Green O-Ring
- O-Ring A Quantity: 1
- O-Ring B Number/Desc: [24661] / Green O-Ring
- O-Ring B Quantity: 1
- O-Ring C Number/Desc: [24681] / Green O-Ring
- O-Ring C Quantity: 2
- Refrigerant Type: R134A
- Style: w/o Solenoid
- Suc In Size IN: 0.710
- Suc In Size MM: 18.200
- Suc Out Size IN: 0.710
- Suc Out Size MM: 18.200
- Suction Inlet Fitting Gender: Female
- Suction Inlet Fitting Thread Diameter: No. 10; No. 12
- Suction Inlet Type: O-Ring
- Suction Outlet Fitting Gender: Female
- Suction Outlet Fitting Thread Diameter: No. 10; No. 12
- Suction Outlet Type: O-Ring
- Super Heat: -0.250
- Switch Included: Not Included
- Tonnage: 1.500
- UPC: 096361391864
- Part Description: A C Expansion Valve
 $130.43 MSRP:
$246.12You Save: $115.69 (48%)Product Specifications- Other Names: Expansion Valve
- Item Dimensions: 7.7 x 6.1 x 4.9 inches
- Item Weight: 1.50 Pounds
- Fitment Type: Direct Replacement
- Replaces: 89022549
- Part Description: Expansion Valve
FAQ for A/C Expansion Valve Repair
Q: How to install the Thermal Expansion Valve?
A:
First, you need to lubricate the O-rings and install the A/C lines into the TXV. Then, please slide the TXV onto the evaporator core until seated and install the TXV line bracket. You also need to install new insulation onto the lines and TXV and install the instrument panel (I/P) carrier. Finally, you should install new insulation onto the lines and TXV and install the instrument panel (I/P) carrier.
By Bob
GM Specialist
28/10/2022Q: What is the recommended torque for the HVAC line clamp screw?
A:
The recommended torque is 1Nm(8 lb in).
By Bob
GM Specialist
28/10/2022Q: How to remove the Thermal Expansion Valve?
A:
First, you need to remove the instrument panel (I/P) carrier and remove the insulation from the thermal expansion valve (TXV). Then, please remove the HVAC line clamp screw, the HVAC line clamp, the bolts that secure the TXV to the evaporator, and the TXV line bracket. Finally, you should remove the TXV from the evaporator core, separate the TXV from the A/C lines by pulling straight out and remove the TXV.
By Bob
GM Specialist
28/10/2022