< Back ×
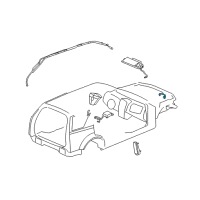
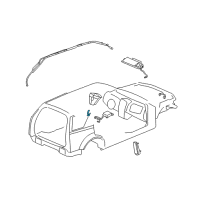
2008 Cadillac SRX Air Bag Sensor
My Vehicle Change Vehicle
2008 Cadillac SRX
< Back to View All
Air Bag
- Department
- Prices
 Product Specifications
- Location: Driver Side; Passenger Side
- Other Names: Front Impact Sensor, Front Sensor
- Item Dimensions: 3.4 x 3.1 x 3.1 inches
- Item Weight: 0.40 Pounds
- Fitment Type: Direct Replacement
- Require Quantity: 2
- Part Description: 2008 Cadillac SRX Front Sensor
Vehicle Fitment- 2008 Cadillac SRX | Base | 6 Cyl 3.6 L GAS, 8 Cyl 4.6 L GAS
 Product Specifications
- Location: Driver Side; Passenger Side
- Other Names: Side Impact Sensor, Side Sensor
- Item Dimensions: 3.5 x 3.1 x 3.2 inches
- Item Weight: 0.40 Pounds
- Fitment Type: Direct Replacement
- Require Quantity: 2
- Part Description: 2008 Cadillac SRX Side Sensor
Vehicle Fitment- 2008 Cadillac SRX | Base | 6 Cyl 3.6 L GAS, 8 Cyl 4.6 L GAS
FAQ for Air Bag Sensor Repair
Q: How to remove the Roof Side Rail Inflatable Restraint Module-Left Side?
A:
You should disable the supplemental inflatable restraint system, remove the windshield garnish molding, the center pillar garnish moldings, the side door opening garnish molding, the body side rear trim panel, the connector position assurance (CPA) from the harness connector to the inflatable restraint roof rail module, lower the headliner to gain clearance to the roof rail module, disconnect the connector from the roof rail module and remove the fasteners from the roof rail module, the tether from the windshield pillar and the roof rail module from the roof.
By Bob
GM Specialist
01/11/2022Q: How to remove the Roof Side Rail Inflatable Restraint Module-Right Side?
A:
You should disable the supplemental inflatable restraint system, remove the windshield garnish molding, the center pillar garnish moldings, the side door opening garnish molding, the body side rear trim panel, and the connector position assurance (CPA) from the connector to the inflatable restraint roof rail module, disconnect the connector from the roof rail module, remove the fasteners from the roof rail module, lower the headliner to gain clearance to the roof rail module and remove the tether from the windshield pillar and the roof rail module from the roof.
By Bob
GM Specialist
01/11/2022Q: What is the recommended torque for the Inflatable Restraint Vehicle Rollover Sensor Nut?
A:
The recommended torque is 10 Nm (89 lb in).
By Bob
GM Specialist
01/11/2022Q: What is the recommended torque for the SIS mounting fasteners?
A:
The recommended torque is 9 Nm (80 lb in).
By Bob
GM Specialist
01/11/2022Q: What is the recommended torque for the mounting fasteners?
A:
The recommended torque is 9 Nm (80 lb in).
By Bob
GM Specialist
01/11/2022Q: How to replace the Inflatable Restraint Vehicle Rollover Sensor?
A:
When performing service on or near the SIR components or the SIR wiring, the SIR system must be disabled. Then, you should disable the SIR and remove the center console.
By Bob
GM Specialist
01/11/2022Q: How many nuts attach to the inflatable restraint vehicle rollover sensor?
A:
There are 3 nuts attaching the inflatable restraint vehicle rollover sensor.
By Bob
GM Specialist
01/11/2022Q: How to remove the Inflatable Restraint Side Impact Sensor?
A:
You should disable the SIR system, move the seat to the full forward position, remove the center pillar trim panel and the connector position assurance (CPA) from the harness connector to the inflatable restraint side impact sensor (SIS), disconnect the harness connector from the SIS, remove the SIS mounting fasteners and the SIS from the center pillar.
By Bob
GM Specialist
01/11/2022Q: How to remove the Inflatable Restraint Front End Sensor?
A:
You should disable the SIR system, remove the connector position assurance (CPA) from the wiring harness connector to the inflatable restraint front-end sensor, disconnect the wiring harness connector from the front-end sensor, loosen the front-end sensor mounting fastener, which is located in the upper tie bar and remove the front end sensor from the upper tie bar.
By Bob
GM Specialist
01/11/2022Q: How to install the Inflatable Restraint Sensing and Diagnostic Module (SDM)?
A:
You should remove any dirt, grease, or other impurities from the mounting surface, install the SDM horizontally to the console floor, point the arrow on the SDM toward the front of the vehicle, install the SDM mounting fasteners, connect the wiring harness connector to the SDM, push the flex lock button down, move the sliding connector locking cover to the close position, install the CPA to the wiring harness connector to the inflatable restraint SDM, the console and the driver and the passenger seats to the original position, enable the SIR system and program the new SDM into the dash integration module.
By Bob
GM Specialist
28/10/2022See more FAQs (7)