< Back ×
2008 GMC Yukon Cigarette Lighters
My Vehicle Change Vehicle
2008 GMC Yukon
< Back to View All
Cigarette Lighters
- Department
- Prices
 $8.66 MSRP:
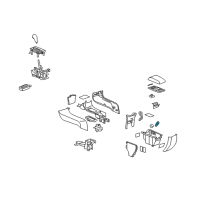
$13.05You Save: $4.39 (34%)Product Specifications- Notes: Tahoe & Yukon; Tahoe & Yukon W/O Denali; Yukon W/Denali; Chevrolet & GMC; Center Seat, 2008-14; Right Side
- Location: Passenger Side
- Item Dimensions: 2.8 x 1.5 x 1.1 inches
- Item Weight: 0.30 Pounds
- Fitment Type: Direct Replacement
- Replaces: 1999477, 12450044, 01999477
- Part Description: 2008 GMC Yukon Accessory Power Receptacle
Vehicle Fitment- 2008 GMC Yukon | Denali, Denali Hybrid, Hybrid, SL, SLE, SLT | 8 Cyl 4.8 L GAS, 8 Cyl 5.3 L FLEX, 8 Cyl 5.3 L GAS, 8 Cyl 6.0 L FULL HYBRID EV-FLEX (FHEV), 8 Cyl 6.0 L FULL HYBRID EV-GAS (FHEV), 8 Cyl 6.0 L GAS, 8 Cyl 6.2 L FLEX, 8 Cyl 6.2 L GAS
 $13.51 MSRP:
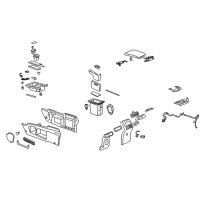
$20.09You Save: $6.58 (33%)Product Specifications- Notes: Right Side
- Location: Passenger Side
- Item Dimensions: 2.8 x 1.6 x 1.2 inches
- Item Weight: 0.30 Pounds
- Fitment Type: Direct Replacement
- Replaces: 12450043
- Part Description: 2008 GMC Yukon Receptacle Asm, Cigarette Lighter
Vehicle Fitment- 2008 GMC Yukon | Denali, Denali Hybrid, Hybrid, SL, SLE, SLT | 8 Cyl 4.8 L GAS, 8 Cyl 5.3 L FLEX, 8 Cyl 5.3 L GAS, 8 Cyl 6.0 L FULL HYBRID EV-FLEX (FHEV), 8 Cyl 6.0 L FULL HYBRID EV-GAS (FHEV), 8 Cyl 6.0 L GAS, 8 Cyl 6.2 L FLEX
FAQ for Cigarette Lighters Repair
Q: What is the procedure for voltage measuring?
A:
You can set the rotary dial of the DMM to the V (DC) position, connect the positive lead of the DMM to one end of the circuit to be tested, connect the negative lead of the DMM to a good ground, turn ON the ignition and operate all accessories and if the voltage measured is greater than 1 volt, there is a short to voltage in the circuit.
By Bob
GM Specialist
29/10/2022Q: What's the installation procedure for the cigar lighter receptacle or 12-volt accessory power receptacle?
A:
You should route the connector, install the retainer, connect the electrical connector to the receptacle, align the tabs on the receptacle to the slots in the retainer, install the accessory power receptacle and install the accessory power receptacle fuse.
By Bob
GM Specialist
29/10/2022Q: What is the required tool for the Fused Jumper Wires?
A:
The required tool is the J 36169-A Fused Jumper Wire.
By Bob
GM Specialist
29/10/2022Q: What is the repair procedure for AFL/EPC Connectors?
A:
You can use the appropriate terminal, follow the instructions in the J-38125 and find the location of the terminal in the repair tray and the proper crimp tool in the appropriate connector end view.
By Bob
GM Specialist
29/10/2022Q: What should be noticed when you use the Fused Jumper Wires
A:
You should notice that a fused jumper may not protect solid-state components from being damaged. the J 36169-A includes small clamp connectors that provide adaptation to most connectors without damage, and this fused jumper wire is supplied with a 20-A fuse which may not be suitable for some circuits. you should not use a fuse with a higher rating than the fuse that protects the circuit being tested.
By Bob
GM Specialist
29/10/2022Q: What is the required tool for the cigar lighter receptacle or 12-volt accessory power receptacle replacement?
A:
The required tool is the J 42059 Cigar Lighter Socket Remover.
By Bob
GM Specialist
29/10/2022Q: What is the special tool for the auxiliary power outlet?
A:
The special tool is the J 42059 Cigar Lighter Socket Remover.
By Bob
GM Specialist
29/10/2022Q: What should you do if J 42059 tool fails to release the lighter socket from the retainer?
A:
You should insert a small grinding tool with a cutoff wheel into the socket, remove the plastic latches in the 3 mm (0.11 in) square windows and use the J 42059 as directed above to remove the socket.
By Bob
GM Specialist
29/10/2022Q: How do you remove the JST connectors?
A:
You can remove the connector while depressing the lock, locate the two indents of the terminal position assurance (TPA) located on the bottom of the connector body, use a small flat-blade tool to very carefully raise the TPA on both sides of the connector, use the J 38125-12A tool to release the terminals, use the tool to move the terminal release to the right, pull the wire out of the back of the connector while holding the removal tool in place.
By Bob
GM Specialist
29/10/2022Q: What is the repair procedure for the JST Connectors?
A:
You can use the appropriate terminal, follow the instructions in the J-38125 and find the location of the terminal in the repair tray and the proper crimp tool in the appropriate connector end view.
By Bob
GM Specialist
29/10/2022See more FAQs (6)