< Back ×
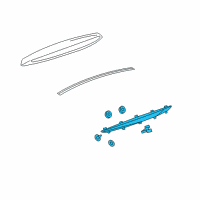
2009 Cadillac SRX Third Brake Light
My Vehicle Change Vehicle
2009 Cadillac SRX
< Back to View All
Tail Lights
- Department
- Prices
 Product Specifications
- Other Names: High Mount Lamp
- Item Dimensions: 40.3 x 8.5 x 8.2 inches
- Item Weight: 1.70 Pounds
- Fitment Type: Direct Replacement
- Replaces: 15145960
- Part Description: 2009 Cadillac SRX Lamp Asm-High Mount Stop
Vehicle Fitment- 2009 Cadillac SRX | Base | 6 Cyl 3.6 L GAS, 8 Cyl 4.6 L GAS
FAQ for Third Brake Light Repair
Q: What is the removal procedure for the high-mount stop lamp?
A:
The procedure is to remove the liftgate and the fasteners securing the high-mounted stop lamp to the liftgate, separate the rear edge weatherstrip of the bezel from the liftgate, disconnect the high-mounted stop lamp electrical connector, separate the front edge weatherstrip from the bezel, remove the fasteners securing the high mounted stop lamp to the bezel and remove the high mounted stop lamp.
By Bob
GM Specialist
01/11/2022Q: How do you install the high-mount stop lamp?
A:
You can clean any tape residue from the liftgate and the high-mounted stop lamp bezel, wipe dry the liftgate, the high-mounted stop lamp, and the bezel, install the high-mounted stop lamp, install the fasteners that secure the high-mounted stop lamp to the bezel, peel back the protective cover, position the notches on the new rear edge weatherstrip, press the new rear edge weatherstrip onto the high mounted stop lamp bezel, connect the high mounted stop lamp electrical connector, peel back the protective cover, position the high mounted stop lamp bezel to the liftgate, press the rear edge of the high mounted stop lamp bezel onto the liftgate, install the fasteners securing the high mounted stop lamp bezel to the liftgate, install the liftgate and work the upper window seal out.
By Bob
GM Specialist
01/11/2022