< Back ×
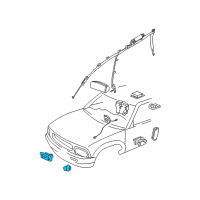
2009 Chevrolet Trailblazer Air Bag Sensor
My Vehicle Change Vehicle
2009 Chevrolet Trailblazer
< Back to View All
Air Bag
- Department
- Prices
 Product Specifications
- Location: Driver Side; Passenger Side
- Other Names: Front Impact Sensor, Front Sensor
- Item Dimensions: 3.3 x 2.2 x 2.1 inches
- Item Weight: 0.50 Pounds
- Fitment Type: Direct Replacement
- Require Quantity: 2
- Part Description: 2009 Chevrolet Trailblazer Front Sensor
Vehicle Fitment- 2009 Chevrolet Trailblazer | Base, LS, LT, SS | 6 Cyl 4.2 L GAS, 8 Cyl 5.3 L GAS, 8 Cyl 6.0 L GAS
 Product Specifications
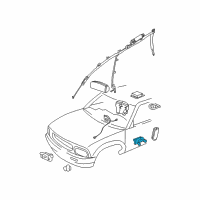
- Location: Driver Side; Passenger Side
- Other Names: Side Impact Sensor, Side Sensor
- Item Dimensions: 3.3 x 2.2 x 2.1 inches
- Item Weight: 0.50 Pounds
- Fitment Type: Direct Replacement
- Require Quantity: 2
- Part Description: 2009 Chevrolet Trailblazer Side Sensor
Vehicle Fitment- 2009 Chevrolet Trailblazer | Base, LS, LT, SS | 6 Cyl 4.2 L GAS, 8 Cyl 5.3 L GAS, 8 Cyl 6.0 L GAS
FAQ for Air Bag Sensor Repair
Q: What is the recommended torque for the roof rail air bag module bolts?
A:
The recommended torque is 9 N.m (79 lb in).
By Bob
GM Specialist
01/11/2022Q: How to remove the Inflatable Restraint Roof Side Rail Module-Front?
A:
First, you need to disable the SIR system, remove the head restraints from the front seats, lower the headliner, and disconnect the roof rail airbag electrical connector. Then, please remove the forward tether bolt, remove the clips from the pillar, remove the 3 bolts retaining the rear curtain to the roof, and remove the bolt retaining the bracket to the roof. Finally, you should remove the forward curtain clip, remove the 3 bolts retaining the airbag module to the roof, and remove the roof rail airbag from the vehicle.
By Bob
GM Specialist
01/11/2022Q: How to install the Inflatable Restraint Vehicle Rollover Sensor?
A:
First, you need to install the nuts securing the rollover sensor to the floor panel. Then, please connect the electrical connectors. Finally, you should install the rear carpet and enable the SIR system.
By Bob
GM Specialist
01/11/2022Q: How to remove the Inflatable Restraint Front End Sensor?
A:
First, you need to disable the SIR system, remove the grille, and remove the headlamp wire harness from the retaining clip. Then, please raise and support the headlamp wire harness to gain access to the front-end sensor, loosen the bolts retaining the sensor to the frame, remove the sensor assembly from the frame, and position the sensor assembly above the front bumper. Finally, you should remove the retaining bolts and protective cover, the connector-position assurance (CPA), disconnect the sensor electrical connector, and remove the sensor from the vehicle.
By Bob
GM Specialist
01/11/2022Q: How to remove the Inflatable Restraint Vehicle Rollover Sensor?
A:
First, you need to disable the SIR system and fold back the rear carpet to gain access to the sensor. Then, please disconnect the electrical connector. Finally, you should remove the nuts securing the rollover sensor to the floor panel.
By Bob
GM Specialist
01/11/2022Q: How to remove the Inflatable Restraint Side Impact Sensor?
A:
First, you need to disable the SIR system and remove the front door trim panel. Then, please peel the rear half of the water deflector away from the door to access the side impact sensor, and remove the screws that retain the side impact sensor to the door. Finally, you should disconnect the impact sensor electrical connector from the side impact sensor, and remove the side impact sensor from the door.
By Bob
GM Specialist
01/11/2022Q: What is the recommended torque for the bolts retaining the discriminating sensor assembly?
A:
The recommended torque is 8 N.m (71 lb in).
By Bob
GM Specialist
01/11/2022Q: How to install the Inflatable Restraint Side Impact Sensor?
A:
First, you need to remove any dirt, grease, or other impurities from the mounting surface, position the side impact sensor horizontally to the door, and connect the electrical connector to the side impact sensor. Then, please install the screws which retain the side impact sensor to the door and fully seat the water deflector to the door. Finally, you should install the door trim panel and enable the SIR system.
By Bob
GM Specialist
01/11/2022Q: What should and shouldn't you do to properly repair the vehicle and return it to its original integrity?
A:
You should not expose inflator modules to temperatures above 65°C (150°F). You should verify the correct replacement part number. You should not substitute a component from a different vehicle. You should only use original GM replacement parts available from your authorized GM dealer. You should not use salvaged parts for repairs to the SIR system.
By Bob
GM Specialist
28/10/2022Q: How to remove the Inflatable Restraint Sensing and Diagnostic Module?
A:
First, you need to disable the supplemental inflatable restraint (SIR) system, remove the floor console, and partially remove the console mounting bracket to allow access to the rear carpet. Then, please position the rear carpet to access the sensing and diagnostic module (SDM), and disconnect the electrical connectors from the SDM. Finally, you should remove the nuts that retain the SDM to the floor panel and remove the SDM from the vehicle.
By Bob
GM Specialist
28/10/2022See more FAQs (6)