< Back ×
2009 Chevrolet Trailblazer Body Control Module
My Vehicle Change Vehicle
2009 Chevrolet Trailblazer
< Back to View All
Light Relays, Switches & Control Modules
- Department
- Brands
- Prices
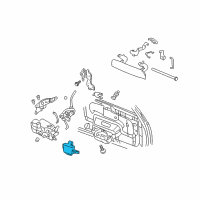
 $97.21Product Specifications
- Notes: w/Remote Entry; Liftgate Module; Stamped 25846782; w/RPO Code AU0 (Remote Entry)
- Connector/Terminal Configuration: Pin
- Housing Height: 2.75"
- Housing Length: 8.5"
- Housing Material: Plastic
- Housing Width: 8.25"
- OE Part Number: 25846782
- UPC: 019495739494
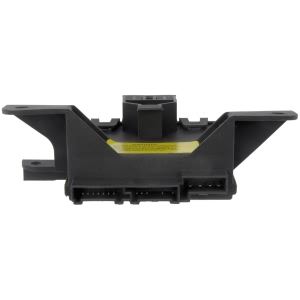
- Part Description: 2009 Chevrolet Trailblazer Body Control Module
Vehicle Fitment- 2009 Chevrolet Trailblazer | All Trims | All Engines
 $190.64 MSRP:
$405.76You Save: $215.12 (54%)Product Specifications- Notes: Short Wheel Base
- Other Names: Control Module
- Item Dimensions: 7.8 x 7.3 x 3.4 inches
- Item Weight: 0.60 Pounds
- Fitment Type: Direct Replacement
- Replaces: 15204779, 15253719, 15071153, 15092007, 15135616, 15180030, 10381268, 15198246, 15852162, 15869971, 15852165
- Part Description: 2009 Chevrolet Trailblazer Rear Body Control Module Assembly
Vehicle Fitment- 2009 Chevrolet Trailblazer | Base, LS, LT, LTZ, North Face, SS | 6 Cyl 4.2 L GAS, 8 Cyl 5.3 L GAS, 8 Cyl 6.0 L GAS
FAQ for Body Control Module Repair
Q: How to install the Body Control Module Body Wiring Harness Extension Harness?
A:
First, you need to use a downward motion to install the body wiring extension to the rear electrical center, connect the 24-way gray electrical connector, the 32-way tan electrical connector, and the body wiring extension to the BCM. Then, please engage the sliding latch and install the rear electrical center cover. Finally, you should position the left-hand second seat to a passenger position and connect the negative battery cable.
By Bob
GM Specialist
01/11/2022Q: How to remove the Body Control Module?
A:
First, you need to disconnect the negative battery cable, position the left-hand second seat to a cargo position, remove the rear electrical center cover, and press down and hold the locking tab. Then, please disengage the sliding latch retaining the BCM to the rear electrical center, disconnect the 40-way body wiring extension from the BCM, and disconnect the 32-way tan electrical connector and the 24-way gray electrical connector from the BCM. Finally, you should remove the BCM from the rear electrical center with an upward motion.
By Bob
GM Specialist
01/11/2022Q: How to install the Liftgate Control Module?
A:
First, you need to install the module to the liftgate and install the bolts that retain the module to the liftgate. Then, please connect the electrical connectors as necessary. Finally, you should install the liftgate trim panel and program the liftgate control module.
By Bob
GM Specialist
01/11/2022Q: How to install the Body Control Module?
A:
First, you need to index the slots on the BCM to the rear electrical center and use a downward motion to install the BCM to the rear electrical center. Then, please connect the 24-way gray electrical connector, the 32-way tan electrical connector, and the 40-way body wiring extension to the BCM. Finally, you should engage the sliding latch, install the rear electrical center cover, position the left-hand second seat to a passenger position, and connect the negative battery cable.
By Bob
GM Specialist
01/11/2022Q: How to remove the Body Control Module Body Wiring Harness Extension Harness?
A:
First, you need to disconnect the negative battery cable, position the left-hand second seat to a cargo position, remove the rear electrical center cover, and press down and hold the locking tab. Then, please disengage the sliding latch retaining the BCM to the rear electrical center, disconnect the body wiring extension, the 32-way tan electrical connector, and the 24-way gray electrical connector from the BCM. Finally, you should disconnect the body wiring extension from the rear electrical center with an upward motion, and remove the body wiring extension from the vehicle.
By Bob
GM Specialist
01/11/2022Q: How to remove the Liftgate Control Module?
A:
First, you need to remove the liftgate trim panel. Then, please disconnect the electrical connectors from the module as necessary. Finally, you should remove the bolts that retain the module to the liftgate and remove the module from the liftgate.
By Bob
GM Specialist
01/11/2022Q: How to remove the Communication Interface Module (TrailBlazer, Envoy)?
A:
First, you need to position the right rear seat bottom to a cargo position. Then, please remove the protective cover from the VCIM and remove the module from the upper bracket by releasing the retaining tab. Finally, you should remove the electrical connectors from the VCIM and remove the VCIM from the vehicle.
By Bob
GM Specialist
29/10/2022Q: How to install the Communication Interface Module Bracket?
A:
First, you need to install the processor bracket to the rear seat studs and install the nut to the rear seat back studs. Then, please position the upper bracket to the processor bracket and slide the upper bracket outboard until all the retaining tabs are seated to the processor bracket. Finally, you should install the communication interface module and the right rear seat cushion.
By Bob
GM Specialist
29/10/2022Q: How to install the Communication Interface Module (TrailBlazer, Envoy)?
A:
If replacing the VCIM, you should record the 10-digit STID number and the 11-digit ESN from the labels on the new module. If replacing the VCIM, please be sure to transfer Bluetooth Antenna, if equipped. First, you need to install the module to the upper bracket ensuring the retaining tab is fully seated. Then, please connect the 2 electrical connectors. Finally, you should install the protective cover to the module and position the right rear seat bottom to a passenger position.
By Bob
GM Specialist
29/10/2022Q: How to remove the Communication Interface Module Bracket?
A:
First, you need to remove the right rear seat cushion and the communication interface module. Then, please use a flat-bladed tool to release the retaining tab on the upper bracket, and slide the upper bracket inboard until the retaining tabs are released from the processor bracket. Finally, you should remove the upper bracket from the processor bracket, remove the nut that retains the processor bracket to the rear seat back stud, and remove the processor bracket from the vehicle.
By Bob
GM Specialist
29/10/2022See more FAQs (5)