< Back ×
2009 Chevrolet Trailblazer Center Console
My Vehicle Change Vehicle
2009 Chevrolet Trailblazer
< Back to View All
Interior & Exterior Trim
- Department
- Brands
- Prices
 $150.91Product Specifications
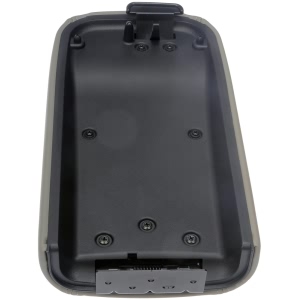
- Notes: Gray; Front Auto Temperature Control
- Attachment Method: Screws
- Color/Finish: Fawn
- Depth: 15 in
- Installation Hardware Included: No
- Length (in): 7.75 in
- Material: Plastic
- OE Part Number: 25998838
- Package Contents: 1 Console Lid
- UPC: 037495096447
- Width (in): 3.2 in
- Part Description: 2009 Chevrolet Trailblazer OE Solutions Center Console Door
Vehicle Fitment- 2009 Chevrolet Trailblazer | All Trims | All Engines
 $149.17 MSRP:
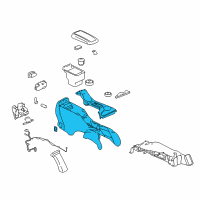
$225.05You Save: $75.88 (34%)Product Specifications- Notes: Chevrolet & GMC W/Short Wheel Base, Chevorlet, W/O Temp Control, Gray
- Other Names: Console Assembly
- Item Dimensions: 44.7 x 22.5 x 16.1 inches
- Item Weight: 7.50 Pounds
- Fitment Type: Direct Replacement
- Part Description: 2009 Chevrolet Trailblazer Console Assembly
Vehicle Fitment- 2009 Chevrolet Trailblazer | Base, LS, LT, SS | 6 Cyl 4.2 L GAS, 8 Cyl 5.3 L GAS, 8 Cyl 6.0 L GAS
 Product Specifications
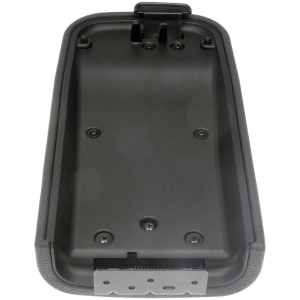
- Notes: Black; Front Manual Temperature Control
- Attachment Method: Screw
- Color/Finish: Black
- Depth: 15 in
- Installation Hardware Included: No
- Length (in): 7.75 in
- Material: Plastic
- OE Part Number: 25998844
- Package Contents: 1 Console Lid
- UPC: 037495096423
- Width (in): 3.2 in
- Part Description: 2009 Chevrolet Trailblazer OE Solutions Center Console Door
Vehicle Fitment- 2009 Chevrolet Trailblazer | All Trims | All Engines
- Product Specifications
- Notes: Chevrolet & GMC W/Short Wheel Base, Chevorlet, W/Temp Control, Ebony
- Other Names: Console Assembly
- Item Dimensions: 45.8 x 23.4 x 16.4 inches
- Item Weight: 3.40 Pounds
- Fitment Type: Direct Replacement
- Part Description: 2009 Chevrolet Trailblazer Console Assembly
Vehicle Fitment- 2009 Chevrolet Trailblazer | Base, LS, LT, SS | 6 Cyl 4.2 L GAS, 8 Cyl 5.3 L GAS, 8 Cyl 6.0 L GAS
- Product Specifications
- Notes: Chevrolet & GMC W/Short Wheel Base, Chevorlet, W/O Temp Control, Ebony
- Other Names: Console Assembly
- Item Dimensions: 44.8 x 18.8 x 18.5 inches
- Item Weight: 7.80 Pounds
- Fitment Type: Direct Replacement
- Part Description: 2009 Chevrolet Trailblazer Console Asm, Front Floor *Ebony
Vehicle Fitment- 2009 Chevrolet Trailblazer | Base, LS, LT, SS | 6 Cyl 4.2 L GAS, 8 Cyl 5.3 L GAS, 8 Cyl 6.0 L GAS
- Product Specifications
- Notes: Chevrolet & GMC W/Short Wheel Base, Chevorlet, W/Temp Control, Gray
- Other Names: Console Assembly
- Item Dimensions: 44.8 x 18.7 x 18.8 inches
- Item Weight: 13.10 Pounds
- Fitment Type: Direct Replacement
- Part Description: 2009 Chevrolet Trailblazer Console Asm, Front Floor *Gray
Vehicle Fitment- 2009 Chevrolet Trailblazer | Base, LS, LT, SS | 6 Cyl 4.2 L GAS, 8 Cyl 5.3 L GAS, 8 Cyl 6.0 L GAS
FAQ for Center Console Repair
Q: How to install the Front Floor Console Cup Holder Door Hinge?
A:
First, you need to slide the front floor console rear cupholder hinge assembly into the front floor console assembly, turn the front floor console upside down, and install the fasteners retaining the front floor console rear cup holder hinge assembly to the front floor console. Then, please install the front floor console rear air duct assembly into the front floor console, and connect the electrical connections to the front floor console rear air duct assembly. Finally, you should install the fastener that retains the front floor console rear air duct assembly to the front floor console assembly, and install the front floor console and the front floor console cup holder assembly.
By Bob
GM Specialist
01/11/2022Q: What will need to be done before replacing the Front Floor Console Armrest Hinge?
A:
You need to remove the front floor console armrest assembly.
By Bob
GM Specialist
01/11/2022Q: What will need to be done before replacing the Front Floor Console Armrest Latch?
A:
You need to remove the front floor console armrest assembly.
By Bob
GM Specialist
01/11/2022Q: How to remove the Roof Console?
A:
First, you need to remove the dome lamp lenses by gently prying the lenses from the console, remove the 2 screws that retain the console to the roof panel, and release the front retaining tabs. Then, please lower the console and disconnect the electrical connectors as needed and remove the console from the vehicle. If you want to replace the console, you should remove the garage door opener, the OnStar(R) microphone, the power sunroof switch, and the noise cancellation microphone if equipped.
By Bob
GM Specialist
01/11/2022Q: How to install the Roof Console?
A:
If you want to install the console, you need to install the noise cancellation microphone, the power sunroof switch, the OnStar(R) microphone, and the garage door opener if equipped. Then, please position the console to the roof panel, connect the electrical connectors as needed, and seat the front retaining tabs. Finally, you should install the 2 screws retaining the console to the roof panel, and install the dome lamp lenses.
By Bob
GM Specialist
01/11/2022Q: What is the recommended torque for the retaining nuts?
A:
The recommended torque is 10 N.m (88 lb in).
By Bob
GM Specialist
01/11/2022Q: What is the recommended quantity of the Front Floor Console Armrest Fasteners?
A:
3Front Floor Console Armrest Fasteners are needed.
By Bob
GM Specialist
01/11/2022Q: What is the recommended torque for the center console retaining screws?
A:
The recommended torque is 2.5 N.m (22 lb in).
By Bob
GM Specialist
01/11/2022Q: What is the recommended torque for the Front Floor Console Armrest Fasteners?
A:
The recommended torque is 2 N.m (18 lb in).
By Bob
GM Specialist
01/11/2022Q: How to install the Roof Console Retainer?
A:
First, you need to install the roof retainer on the roof panel ensuring the Z clips are fully seated. Then, please partially install the 4 screws retaining the roof retainer to the Z clips. Finally, you should install the headliner.
By Bob
GM Specialist
01/11/2022See more FAQs (13)