< Back ×
2010 Cadillac SRX Parking Sensors
My Vehicle Change Vehicle
2010 Cadillac SRX
< Back to View All
Cameras & Driver Safety
- Department
- Brands
- Prices
 $46.57Product Specifications
- Connector Gender: Male
- Mounting Hardware Included: No
- Package Contents: 1 Sensor
- Terminal Gender: Male
- Terminal Quantity: 3
- Terminal Type: Pin
- Universal Or Specific Fit: Specific
- UPC: 885484447943
- Wiring Harness Included: No
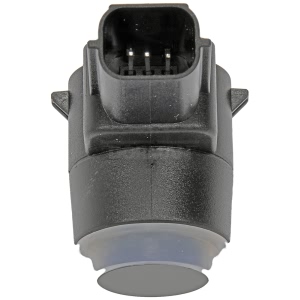
- Part Description: 2010 Cadillac SRX Replacement Front Parking Sensor
Vehicle Fitment- 2010 Cadillac SRX | All Trims | All Engines
 $187.82 MSRP:
$283.36You Save: $95.54 (34%)Product Specifications- Notes: Upper Components, 2010-12; Srx
- Other Names: Park Sensor, Reverse Sensor, Sensor
- Item Dimensions: 2.7 x 1.8 x 1.5 inches
- Item Weight: 0.30 Pounds
- Fitment Type: Direct Replacement
- Part Description: 2010 Cadillac SRX Reverse Sensor
Vehicle Fitment- 2010 Cadillac SRX | Base, Luxury, Performance, Premium | 6 Cyl 2.8 L GAS, 6 Cyl 3.0 L GAS, 6 Cyl 3.6 L FLEX, 6 Cyl 3.6 L GAS
FAQ for Parking Sensors Repair
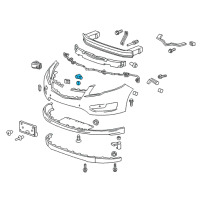
Q: How to replace the front object alarm sensor housing?
A:
You should remove the front fascia, disconnect the sensor harness, remove the sensor from the sensor housing, paint the sensor housing and apply structural adhesive epoxy, Lord Fusor (TM) 127EZ or equivalent, to the fascia at the mating surface. Then, you should install the sensor housing to the fascia, allow the adhesive to cure according to the manufacturer's directions, install the sensor to the sensor housing, connect the electrical harness and install the front fascia.
By Bob
GM Specialist
02/11/2022Q: How to install the rear object sensor?
A:
First, you should paint the rear object sensor, ensure the paint does not exceed 6 mils, and use a paint thickness gauge suitable for non-ferrous metals. Then, you should insert the sensor into the housing, connect the electrical connector to the rear object sensor and install the rear bumper fascia.
By Bob
GM Specialist
02/11/2022Q: How to remove the rear object sensor?
A:
You should remove the rear bumper fascia and disconnect the electrical from the rear object sensor and then lift the locking tabs on the housing and remove the rear object sensor.
By Bob
GM Specialist
02/11/2022Q: How to remove the front object alarm sensor?
A:
You should not refinish previously painted sensors and excess paint buildup will cause the sensor to be inoperative. Then, you should paint the front object alarm sensor, ensure the paint does not exceed 6 mils, and use a paint thickness gauge suitable for non-ferrous metals.
By Bob
GM Specialist
02/11/2022Q: How to remove the rear object sensor housing?
A:
First, you should remove the rear fascia, disconnect the sensor harness and remove the sensor from the sensor housing. The sensor housing must be painted if replaced. If reinstalled, the painting will not be necessary. Then, you should send and/or grind sonic weld plastic residue from the fascia and apply structural adhesive epoxy to the fascia at the mating surface. After that, you should use the alignment tabs, install the sensor housing to the fascia and allow the adhesive to cure according to the manufacturer's directions. Finally, you should install the sensor to the sensor housing, connect the electrical harness and install the rear fascia.
By Bob
GM Specialist
02/11/2022Q: What are the recommended torque for the front and rear object alarm module nuts?
A:
The recommended torque is 6 Nm (53 lb in).
By Bob
GM Specialist
01/11/2022Q: How to replace the front and rear object alarm modules?
A:
You should remove the left body side trim panel and disconnect the electrical connectors. Then, you should program and set up the front and rear object alarm modules.
By Bob
GM Specialist
01/11/2022Q: How many nuts attach to the front and rear object alarm modules?
A:
There are 3 nuts that attach the front and rear object alarm modules.
By Bob
GM Specialist
01/11/2022See more FAQs (3)